Pages

Showing posts with label Bread. Show all posts

Monday, October 15, 2012

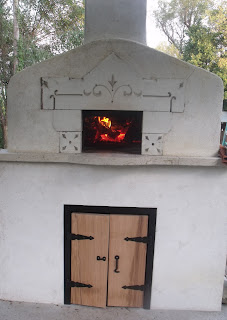
Reconstructing Our Wood Fired Hearth Oven Part 2

Once we have the oven core in place we started looking for finishing materials. The rock we used in the initial construction was long gone, scattered throughout other projects. We looked for more rock but couldn't find anything. We even looked at buying new rock but that is not our way of doing things.


The first piece that came our way was the Indiana limestone slabs that we cut and shaped for the hearth.


Next we were able salvage some decorative cut limestone from a hundred year old house that was being demolished.  The bricks for the chimney came from the same house as the decorative cut limestone.


We used Roxul rock wool insulation around the dome of the oven.


Stucco mesh corner bead over the rock wool.

Ready for Stucco!

First fire!

Ready to bake!!
 Bread ready to load onto the oven
Wood Fired Bread!
Wood Fired Pizza!

Reconstructing Our Wood Fired Hearth Oven Part 1

This is the story of my wood fired brick oven. As with most great adventures ours was born of passion. In this case it was a passion for good bread! In our quest we found the ultimate guide, The Bread Builders: Hearth Loaves and Masonry Ovens by Daniel Wing. This book contains an inspiring discourse on brick oven history as well as oven plans and recipes. It was all my husband needed to design our oven.

Oven construction began late in summer of 2002


A hearth large enough to bake 30 loaves


It was a masterpiece


For two years we used the oven regularly baking for the Farmers Market and throwing amazing pizza parties for friends and family. When we moved to the farm we had to partially disassemble the oven in order to move it. When we had the crane move it to the farm they weighed it. The oven core alone weighs 6,540lbs! There was no time in the midst of moving with five children to dig footings and pour concrete for a new base. We had it set temporally on railroad ties. Temporally? That was seven years ago! We are determined to get it operational again this year.

 This summer we poured a new reinforced foundation and built the new oven base. You can see the oven core on the rail road ties in the background.

 The front loader arrives to move the oven to the new base.


 In order to position the oven on the new base we had to set it down and lift it from with straps from above.


Notice that the oven never touches the base, the rebar provides a gap. This gap allows the heat to stay in the oven and not transfer the base.

I hope you enjoyed these pictures. In part two I'll show how we finished it!


Thursday, January 26, 2012

Rustic Bread


The heart of the Artisan bread movement can not be found sipping infused green tea while nibbling Ciabatta at Panera. Beware of wannabe impostors, many grocery stores and chain bakeries have drawn on the popularity of Artisan bread and now make their own souped up versions with dough enhancers and a medley of other nonessential ingredients. While there are small Artisan bakeries sprinkled throughout our country and have been for decades, the true heart of Artisan baking comes from a rediscovery of traditional recipes and methods tried in our own kitchens.

This is a simple bread that contains no commercial yeast. It has a rich yeasty taste, not quite sour enough to be considered a sourdough.

Rustic Bread
This recipe is done by weight, not volume
Day 1
12 ounces Rye Starter
34 ounces bread flour
18 ounces cool water
1/2 cup wheat bran or wheat germ
2 Tablespoons sea salt

Combine all ingredients, knead 5 minutes, rest 20 minutes

Knead 5 minutes

Turn into an oiled bowl, cover and ferment at room temperature 4 hours

Shape boules, turn into floured basket cover with plastic wrap retard overnight in the refrigerator

Day 2

Remove baskets from the refrigerator and replace the plastic wrap with a proofing cloth to avoid condensation

Proof at room temperature 6 hours of until internal temperature of the dough is 66F

Turn basket onto a cornmeal dusted baking sheet, score the top of the boule

Bake in a 400F oven for 35 minutes until well browned


Tuesday, January 17, 2012

Le Croissant


French cooking is wonderfully over involved. They are able create culinary masterpieces that leave us utterly enchanted. The croissant is no exception. Layer upon layer of crispy buttery delicate perfection. So daunting many home bakers never even bother to attempt it. However, if you just take the time to enjoy the process you will find it is not so difficult after all.

This is an old recipe I've been making for about ten years. It has all the elements I look for in a good bread recipe. It uses real, natural ingredients. No dough enhancers, dry milk, margarine etc. It takes a few days to make which means you wont be tied to the kitchen all day. And, it calls for a preferment so I know the flavor will be well developed. The best flour to use for croissants is a low gluten flour. Pastry, All Purpose flour, or a combination of those work well. I always use instant yeast instead of active dry yeast.

Croissants
Makes 1 dozen


Day 1
Prepare Preferment:
In a small bowl combine,
3 Tbsp lukewarm water
1 Tbsp sugar
2 1/4 teaspoons of instant yeast
1/2 cup flour
Set the preferment aside in a warm place for a few hours until it is light and fluffy

Finish the dough:
In a large bowl combine,
2 cups flour
1 tea salt
3/4 cup of room temp whole, fresh milk (I use goat milk)
Mix well then add the preferment and knead lightly for about 5 minutes. Let the dough rest for 10-15 minutes

While dough is resting dust two sheets of wax paper with flour. Put two sticks of butter side by side between them and flatten to into a 1/2 inch rectangle. Put it in the refrigerator to chill.

Roll the dough out on a floured board into a 1/2 inch thick rectangle. Remove the butter rectangle from the refrigerator and cut it in half. Place one half of the butter in the center of the dough (it should be about a third the size of the dough). Fold one end of the dough over the butter. Place the remaining half of the butter on top of the dough then fold the other end of the dough onto the top. Roll the dough out into a rectangle, fold in half and then in half again to make four layers. Roll it out and make four layers again. Wrap in wax paper and refrigerate overnight.

Day 2

Make the layers,
About an hour and a half before you plan to bake remove the dough from the refrigerator. You will make two turns by rolling it out and folding it into four layers then roll it out again and fold into fourths and refrigerate for 30 minutes. Roll out into two rectangles 4 1/2 inches wide and 1/8 inch thick.


Cut triangles and roll from the wide end with the point up, curve ends to form a crescent shape. Let rise 30 minutes. Combine 1 egg yolk with 2 Tbsp of fresh cream, brush the glaze onto the croissants. Bake at 375F for 15 minutes until golden brown and flaky. Enjoy!

Friday, October 21, 2011

Rustic Cranberry Pecan Boule


This is my Rustic Sourdough Bread recipe with the addition of dried cranberries and toasted pecans. Perfect shared with good friends on a crisp fall evening with aged farmstead cheddar and a big glass of Cabernet Sauvignon.

Rustic Cranberry Pecan Boule
This recipe is done by weight, not volume
Day 1
12 ounces Rye Starter
34 ounces bread flour
18 ounces cool water
1/2 cup whole grain flour (rye, wheat, spelt etc. or a combination)
2 Tablespoons sea salt

Combine all ingredients, knead 5 minutes, rest 20 minutes

Add 4 1/2 ounces lightly toasted pecans and 4 1/2 ounces of dried cranberries

Knead 5 minutes

Turn into an oiled bowl, cover and ferment at room temperature 4 hours

Shape boules, turn into floured basket cover with plastic wrap retard overnight in the refrigerator

Day 2

Remove baskets from the refrigerator and replace the plastic wrap with a proofing cloth to avoid condensation

Proof at room temperature 6 hours of until internal temperature of the dough is 66F

Turn basket onto a cornmeal dusted baking sheet, score the top of the boule with an X

Bake in a 400F oven for 35-45 minutes until well browned

Enjoy!

Monday, October 17, 2011

Bohemian Rye

It really hasn't been until resent history that baking ovens could be found in every home. In fact the village oven can still be found throughout the Middle East and North Africa. For centuries the village oven was fired every other day and women would come from outlying hamlets bringing their baskets of dough ready to rise on the hearth. Gypsies and vagabonds would join the townswomen bringing news from afar. Baking was a festive, social event. This rustic loaf has its roots in ancestry such as this!

Bohemian Rye

Day 1 ~ Preferment
1 cup Rye Starter
1 cup luke warm water
1 cup bread flour
1 cup freshly ground rye

Combine and ferment at room temperature overnight

Day 2 ~ Final Dough
Proof Yeast ~ add 2 teaspoons of instant yeast and 1 teaspoon of sugar to 1 1/2 cups lukewarm water
Add:
     2 cups  freshly ground Rye
     2 cups  bread flour
     2 Tablespoons brown sugar
     2 Tablespoons oil 
     1 Tablespoon salt
     1 Tablespoon caraway seeds
     Preferment from Day 1
Knead for about 7 minutes adding more bread flour as needed to achieve a light elastic dough that is not too sticky.
Rise 1 hour or until dough has doubled in size
Divide into three round loaves, proof in basket about 30-40 min
Turn basket onto a cornmeal dusted baking sheet
Bake at 375F for 35 min.
Enjoy!

Sunday, July 24, 2011

Let the Angels of God Prepare your Bread!


There is a surreal quality to this humble loaf. Hands down my favorite bread. So simple with only two ingredients, wheat berries and salt, no electricity and no need to grind your wheat. When I eat it I feel so amazed, I can hardly believe it's really bread.

Years ago, when I first made this bread, I used a food mill to process the sprouted wheat by hand. Now I use my food processor and it is much easier and faster! Also, even though I bake this in my crock pot I have had good results using a simple home spun solar oven, food dehydrator or the oven with a pilot light.

Essene bread originates with the Essene Monks of 2nd century BC. The technique is found in  The Essene Gospel of Peace,
Let the angels of God prepare your bread.
Moisten your wheat, that the angels of water may enter it.
Then set it in the air, that the angel of air may embrace it.
And leave it from morning to evening beneath the sun, that the angel of sunshine may descend upon it.
And the blessings of the three angels will soon make the germ of life to sprout in your wheat.
Then crush your grain, and make thin wafers, as did your forefathers when they departed out of Egypt, the house of bondage.
Put them back again beneath the sun from its appearing, and when it is risen to its highest in the heavens, turn them over on the other side that they may be embraced there also by the angel of sunshine, and leave them there until the sun sets.
For the angels of water, and air and of sunshine fed and ripened the wheat in the field, and they likewise must prepare also your bread.
And the same sun which, with the fire of life, made the wheat to grow and ripen, must cook your bread with the same fire. For the fire of the sun gives life to the wheat, to the bread, and to the body. But the fire of death kills the wheat, the bread, and the body.
And the living angels of the living God serve only living men. For God is the God of the living, and not the God of the dead.

Over the years this bread has somehow become confused with the formula from Ezekiel 4:9 in the Bible. Ezekiel bread is a nutrient dense combination of legumes and grains, however there is no mention of sprouting. The instructions state,
Take thou also unto thee wheat, and barley, and beans, and lentils, and millet, and spelt, and put them in one vessel, and make thee bread thereof; Ezekiel 4:9


Essene Bread
3 cups wheat berries, or grains of your choice
1 tea sea salt

Soak wheat berries for 8 hours or overnight. Rinse and drain the berries 2-3 times a day for 32 hours or until the wheat berries have sprouted ¼ inch tails. Do not rinse the sprouts the morning you plan to make the bread or the sprouts will be too wet.

 Sprouted Wheat

Place the sprouted wheat berries into your food processor with the S blade in place and mix until the berries resemble a smooth bread dough that forms a ball around the blade.

 Almost there

 Perfect

Shape loaves

Remove the dough from the food processor. Shape the dough into 2 small hearth loaves. Place the loaves into the crock pot and cook on the lowest setting for 6-8 hours. If you keep the heat under 115F you will maintain the integrity of the enzymes in the sprouts and the bread would be considered a raw-living food.
During the sprouting process, starches convert to sugars. This gives the finished bread a rustic, dark brown color. The top crust may crack and will be quite thick but the inside will be moist, dense and somewhat sweet. Allow it to cool, then slice and store in the refrigerator for up to a week.


There are many ways to vary this bread. Try adding dried fruit, nuts, seeds or spices. Or, play with the shape. Try bagels, flat bread and pretzels! There are also hybrid versions of this bread which incorporate flour with yeast or sourdough starter.

I hope you will add this wonderful bread into your repertoire. It is simple to make, delicious, high in protein, and extra nutritious because of the sprouted wheat.